1.5.1.5 Shared Folder
SHARED FOLDER
this command must be executed on server shared folder host
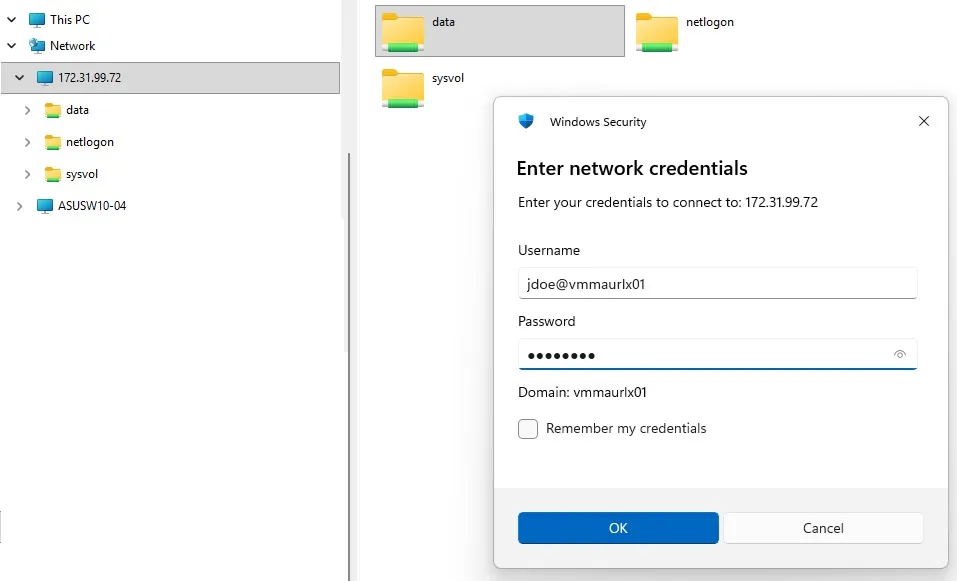
windows shared folders are accessible through smb:// protocol. In linux this is given by samba package
Install it if not present
$ sudo apt install samba -y
edit /etc/samba/smb.conf
$ sudo nano /etc/samba/smb.conf
and set at the bottom the shared folder(s) you want
this is a private folder example
[data] # or [nome_shared_data_tag]
comment = Etere shared folder
path = /home/data
browseable = yes
read only = no
create mask = 0777
directory mask = 0777
valid users = sis, VMMAURLX01\jdoe
this is a public folder example (no need to log with user and password
[PublicShare] # or [PublicShare2_tag]
comment = Public network folder
path = /home/PublicShare
browsable = yes
guest ok = yes
read only = no
create mask = 0666
directory mask = 0777
to set a samba password for external logins (ex., from Windows), this command must be executed on server shared folder host, this command must be executed only for local user :
sudo smbpasswd -a your_username
sudo chmod 777 /home/data # give Read/Write permission to shared folder
to test the smb.conf synthax without executing it
testparm /etc/samba/smb.conf
after every new settings, restart samba service
sudo systemctl restart smbd
ACCESS THE FOLDER
to access the folder from the terminal you have two options
smbclient # it behaves like FTP client, you can connect to the shared folder with smbclient //IPsharedfolder/sharedfolder and have its personalized commands
cifs-utils # Mount the drive locally
smbclient:
install smbclient:
sudo apt install smbclient -y
then you can already connect with:
smbclient //IP_ADDRESS/SHARE_NAME -U YOUR_USERNAME
ex: sudo smbclient //dc1/data -U jdoe@vmmaurlx01
common commands:
ls or dir # list files and folders
cd # enter the directory
pwd # print the current working directory path on the remote share
get # download a file
mget # download a set of files matching a wildcard (ex mget *.pdf)
put # upload a file
mput # upload a set of files matching a wildcard (ex mput *.pdf)
mkdir # create a directory
rmdir # delete a directory
rm # delete a file
rename <oldname> <newname> # rename a file
lcd <local_directory> # change your local directory without disconnecting from the share
! <command> # run any standard linux command on local machine without disconnecting
cifs-utils:
the concept of this method is to mount the shared folder to a directory, and make it accessible for the users you want to be able to interact with it.
There will be two layers of authentication: the first related to the Kerberos ticket and the second related to the unix permissions.
prerequisites client side:
sudo apt install cifs-utils keyutils -y
then, create a directory as "mount point":
sudo mkdir -p /mnt/shared_folder
sis@dc2:/mnt$ ls
data1 shared_folder_DC2
Client must resolve domain name:
host -t SRV _kerberos._tcp.<yourdomain.local>
cat /etc/krb5.conf
Kerberos anchor identity:
this will be the anchor identity of the mount (cruid=0) needed to mount the volume. If the client is joined to the domain it should already have a keytab created. Verify:
realm list
Ex:
sis@dc2:~$ realm list
vmmaurlx01.local
type: kerberos
realm-name: VMMAURLX01.LOCAL
domain-name: vmmaurlx01.local
configured: kerberos-member
server-software: active-directory
client-software: sssd
required-package: sssd-tools
required-package: sssd
required-package: libnss-sss
required-package: libpam-sss
required-package: adcli
required-package: samba-common-bin
login-formats: %U@vmmaurlx01.local
login-policy: allow-realm-logins
must show the spn of the worstation
ex:
sis@dc2:~$ sudo klist -k /etc/krb5.keytab
Keytab name: FILE:/etc/krb5.keytab
KVNO Principal
---- --------------------------------------------------------------------------
2 DC2$@VMMAURLX01.LOCAL
2 DC2$@VMMAURLX01.LOCAL
2 DC2$@VMMAURLX01.LOCAL
2 host/DC2@VMMAURLX01.LOCAL
2 host/DC2@VMMAURLX01.LOCAL
2 host/DC2@VMMAURLX01.LOCAL
2 RestrictedKrbHost/DC2@VMMAURLX01.LOCAL
2 RestrictedKrbHost/DC2@VMMAURLX01.LOCAL
2 RestrictedKrbHost/DC2@VMMAURLX01.LOCAL
sis@dc2:~$
prerequisites server side (host of the shared folder):
samba needs cifs SPN registered and it is not automatic like in windows. Check:
sudo samba-tool spn list <NAME-DC>$
if you don't have entries like cifs/HOSTNAME, add them: # check again, may be not necessary
samba-tool spn add cifs/PCNAME.domain.local PCNAME$
samba-tool spn add cifs/PCNAME PCNAME$
remember to restart the service after these modifications: systemctl restart samba-ad-dc
create a group with complete RFC2307 attributes:
to control read/write accesses create an AD group with GID number and posixGroup scheme, otherwise sssd/winbind won't recognize it as unix-enabled:
samba-tool group add data-access --gid-number=<GID> --nis-domain=<domain-nis>
ex.:
sis@dc1:~$ sudo samba-tool group add data-access --gid-number=001 --nis-domain=vmmaurlx01
Added group data-access
sudo samba-tool group addmembers data-access <user1> <user2> ...
verify that you have both objectClass and gidNumber
samba-tool group show data-access --attributes=gidNumber,objectClass
sis@dc1:~$ sudo samba-tool group list # show a group list
Users
data-access
Replicator
Domain Controllers
Server Operators
Network Configuration Operators
Event Log Readers
Domain Admins
Domain Guests
Enterprise Admins
Print Operators
Account Operators
Read-only Domain Controllers
Certificate Service DCOM Access
Administrators
Denied RODC Password Replication Group
Terminal Server License Servers
Domain Computers
Backup Operators
Windows Authorization Access Group
Incoming Forest Trust Builders
DnsUpdateProxy
Remote Desktop Users
Group Policy Creator Owners
IIS_IUSRS
RAS and IAS Servers
Pre-Windows 2000 Compatible Access
Cryptographic Operators
Domain Users
Enterprise Read-only Domain Controllers
sis@dc1:~$ sudo samba-tool group listmembers data-access # show a group member list
sis
jdoe
sis@dc1:~$
on original folder (/home/data in this case), set permissions to 771 and the previous created group as owner
chown root:data-access /home/data
chmod 771 /home/data
if you look with ls -la /home/data this will give execution permission to "others", this to ensure that at every reboot the root account has sufficient permissions to at least mount the volume.
root doesn't have read permissions in this way, but it still has "power" to execute a file if it knows its name, so, on samba configuration , check with sudo nano /etc/samba/smb.conf that you have for your shared folder (in the example, [data]):
[data]
comment = Shared folder
path = /home/data
browseable = yes
read only = no
create mask = 0770
directory mask = 0770
valid users = @data-access, DOMAIN\CLIENTNAME$ ## ex. valid users = @data-access = group name, DOMAIN\CLIENTNAME$ = PC client name,
create mask and directory mask will ensure that every file created in this way has read/write permissions only for root:data-access , despite the directory.
after the preparation from server and client side:
edit /etc/sssd/sssd.conf and add
[domain/dominio.local]
krb5_ccache_template = FILE:/tmp/krb5cc_%U
and restart sssd
sudo systemctl restart sssd
to force the ticket in a determined folder because by default SSSD creates a standard ticket /tmp/krb5cc_<uid>_XXXXXX that CIFS is not able to find.
then fetch kerberos ticket in client account
sudo kinit -k 'DC2$@VMMAURLX01.LOCAL' -t /etc/krb5.keytab
sudo klist # verify the ticket
sis@dc2:~$ sudo KRB5CCNAME=/tmp/krb5cc_0 klist
Ticket cache: FILE:/tmp/krb5cc_0
Default principal: DC2$@VMMAURLX01.LOCAL
Valid starting Expires Service principal
07/27/26 10:33:13 07/27/26 20:33:13 krbtgt/VMMAURLX01.LOCAL@VMMAURLX01.LOCAL
renew until 07/28/26 10:33:13
on some distributions , the session doesn't have a valid keyring. The quickest way to obtain it is
from client side:
sudo keyctl session #opens a root session
sis@dc2:~$ sudo keyctl session
Joined session keyring: 422901299
sudo nano /etc/pam.d/sudo
and add
session optional pam_keyinit.so force revoke
this to prevent to use everytime "sudo keyctl session"
note: this modification will be applied only on new sudo sessions after saving the file.
sudo mount -t cifs //servername.domain.local/data /mnt/data -o sec=krb5,multiuser,cruid=0,vers=3.0
sudo mount | grep cifs #verify the mount
note: you can't use IP address because SPN kerberos is registered with an hostname, so it would fail with error -126 (required key not avaiable)
to make the mount persistent edit fstab with sudo nano /etc/fstab and add this last entry
//dc1.domain.local/data /mnt/data cifs sec=krb5,multiuser,cruid=0,vers=3.0,_netdev 0 0
now you can verify permissions: from a local user not in "valid users"
touch /mnt/data/test_fails
you should expect "permission denied"
then log in with a domain user with a kerberos ticket
su jdoe@dc1.domain.local
kinit jdoe@DC1.DOMAIN.LOCAL
klist jdoe@DC1.DOMAIN.LOCAL #verify the ticket
then
touch /mnt/data/test_ok
ls -l /mnt/data/test_ok
you should find in the folder the newly file just created
RENEW KERBEROS TICKET
a tipical kerberos user ticket lasts about 10 hours. To renew periodically a kerberos ticket you can plan a periodic renewal with krenew:
apt install heimdal-clients
create a script for renewal
sudo nano /usr/local/bin/renew-krb-tickets.sh
.
.
.
#!/bin/bash
for ccache in /tmp/krb5cc_*; do
[[ "$ccache" =~ ^/tmp/krb5cc_[0-9]+$ ]] || continue
KRB5CCNAME="FILE:$ccache" klist -s 2>/dev/null || continue
KRB5CCNAME="FILE:$ccache" kinit -R 2>/dev/null
done
crtl+o and ctrl+x to save and exit
now create the service to automate it
sudo nano /etc/systemd/system/krb-renew.service
.
.
.
# /etc/systemd/system/krb-renew.service
[Unit]
Description=Renew Kerberos tickets for active users
[Service]
Type=oneshot
ExecStart=/usr/local/bin/renew-krb-tickets.sh
# /etc/systemd/system/krb-renew.timer
[Unit]
Description=Run Kerberos ticket renewal periodically
[Timer]
OnBootSec=5min
OnUnitActiveSec=1h
Unit=krb-renew.service
[Install]
WantedBy=timers.target
now enable it
systemctl daemon-reload
systemctl enable --now krb-renew.timer
for the machine ticket there will be a different approach, it will be renewed at every boot:
edit
sudo nano /etc/systemd/system/kinit-cifs.service
and insert
[Unit]
Description=Load Ticket Kerberos Machine Account at Boot
After=network-online.target sssd.service
Wants=network-online.target
[Service]
Type=oneshot
ExecStart=/usr/bin/kinit -k -t /etc/krb5.keytab UBUNTU-QUORUM$
[Install]
WantedBy=multi-user.target
then enable and start it
sudo systemctl enable kinit-cifs.service
sudo systemctl start kinit-cifs.service
 Linux-_shared_folder_user_jdoe