99.1.4.1 Censor Ex Main View
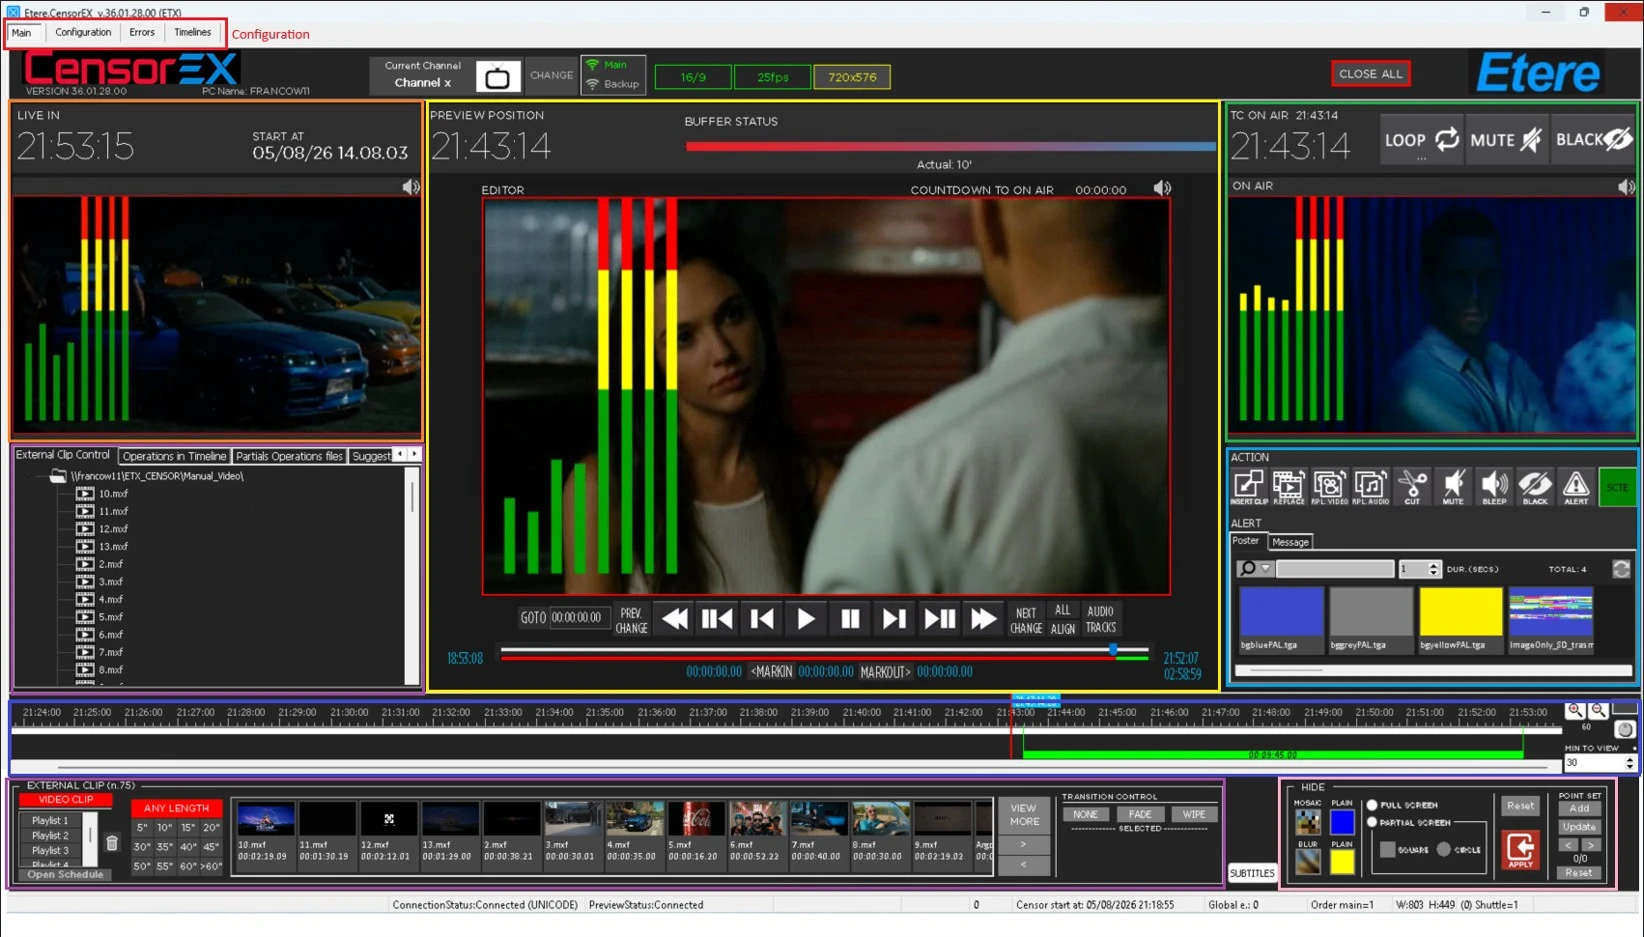
When launching the Etere Censor EX desktop application, the main interface is organized into multiple functional areas, each designed to provide operators with complete control over the censorship workflow.
The interface is divided into 10 main areas, allowing operators to monitor incoming content, manage the delayed buffer, perform censorship operations, and control the final on-air output.
The main areas are described below.
1. Tool Menu (Top Left)
The Tool Menu provides access to general application functions and advanced configuration areas.
The available sections are:
• Main: Provides access to the main application interface.
• Configuration: Contains the application configuration parameters required for the correct operation of CENSOR EX.
This section includes advanced settings and should only be accessed by:
• Etere technical personnel.
• Local workstation administrators.
• Errors: Displays the list of errors detected by the application. This area is mainly used for troubleshooting and debugging activities.
• Timelines: Provides advanced timeline commands used for diagnostic and debugging purposes.
These functions are intended only for:
• Etere technical personnel.
• Local workstation administrators.
2. Remote Information Panel (Top Center)
The Remote Information area provides general information about the current CENSOR EX configuration and connection status.
It displays:
• CENSOR EX logo.
• Current channel name.
• Current video format information.
• Connection status with the required services and NDI streams.
The Open/Close All Services button allows operators or administrators to establish or disconnect the communication with the configured services and related video streams.
3. Live In Area (Center Left)
The Live In area displays the incoming video source acquired by the configured Time Delay service.
This section provides real-time monitoring of the incoming signal and displays information such as:
• Current system time.
• Recording start information.
• Connection status with the incoming stream.
Additional options are available:
• External Monitor Preview: Allows the Live In video to be displayed on an additional monitor.
This option is available only when multiple monitors are connected to the workstation.
• Start At information – Indicates the time from which the workstation is connected to the incoming stream.
4. Preview Area (Center)
The Preview Area displays the video content selected through the Timeline position.
Operators can move the Timeline cursor backward and forward through the recorded content generated by the Time Delay Service. The Preview Area updates according to the selected position, allowing operators to identify the exact section to be censored.
This area provides:
• Video preview.
• Buffer status information.
• Countdown to on-air information.
• Shuttle control buttons for navigation.
• Audio enable/disable controls.
• Mark In and Mark Out controls.
5. On-Air Area (Center Right)
The On-Air area displays the censored video currently transmitted to the broadcast output.
The displayed content corresponds to the delayed output, normally operating with a configured delay (for example, 10 minutes or more).
Available controls include:
• Audio enable/disable.
• Timeline bar information.
• Loop function.
• Mute audio.
• Cut to Black.
• On-Air timecode display.
This section represents the final output that is transmitted after censorship operations have been applied.
6. Operations Area (Middle Left)
The Operations Area provides information and management functions related to available content and performed operations.
It includes:
• Available video files used for censorship.
• Timeline operations already performed.
• Partial operations.
• AI-generated censorship suggestions.
This area allows operators to review available actions and manage the content workflow.
7. Censorship Actions Area (Middle Right)
The Censorship Actions Area contains the main commands used to modify the delayed content.
Available actions include operations such as:
• Insert video.
• Replace video.
• Replace audio.
• Delete content.
• Mute audio.
• Bleep audio.
• Apply alerts.
• Other available censorship functions.
These controls allow operators to quickly apply the required action during live operations.
8. Timeline Area (Bottom Center)
The Timeline Area is the main workspace used to navigate through the delayed content.
Operators can:
• Move backward and forward through the recorded buffer.
• Locate specific events.
• Define Mark In and Mark Out positions.
• Apply censorship operations.
• Review previously performed edits.
All applied operations are displayed directly on the Timeline through dedicated markers, providing complete visibility of the censorship workflow.
9. Media Library Area (Bottom Left)
The Media Library Area is connected to the Operations Area and displays the available media content.
It provides:
• List of video files available in the configured media path.
• Media selection for replacement and insertion operations.
• Clip export functionality.
• Import of advertising clusters from Etere environments.
This area allows operators to quickly access the content required for censorship operations.
10. Hide Effects and Subtitle Area (Bottom Right)
The bottom-right area contains additional censorship tools.
It provides:
• Hide Effects: Allows operators to apply visual masking effects such as: Mosaic, Blur, Plain color masking and Partial or full-screen hiding.
• ubtitle Management: Allows operators to view and manage subtitle information associated with the video content.
These functions provide additional control over sensitive visual and textual content during the censorship workflow.
The CENSOR EX interface has been designed to provide operators with a complete and intuitive environment where monitoring, editing, and on-air control functions are available within a single workspace.
 Etere_Censor_Ex_Areas